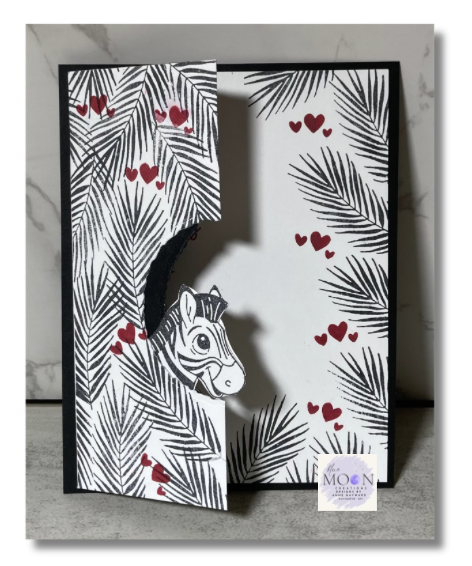
A stamped reflection is an easy way to turn a two-sided image—like this sweet zebra—into a fun interactive design.
Instructions:
Create card front:
-Start with Basic White card stock measuring 5¼" x 8½".
Score at 4¼".
-Trim 1¾" off one long edge to create the offset front panel.
-Using a circle punch or die, cut a half-circle opening along the trimmed edge.
-From Basic Black card stock measuring 1¼" x 5¼", punch or die-cut a matching circle.
-Stamp the zebra from Silly Safari onto Basic White using Memento Black ink. Fussy cut with
scissors.
-Stamp the leaf images from Silly Safari on both the card front and inside panel using Memento Black ink.
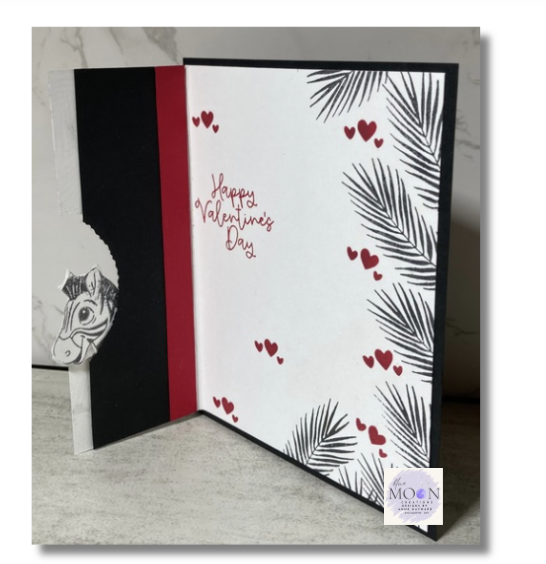
-Add hearts and greeting from Bee My Valentine using Real Red ink.
Create Zebra
Reflection:
-Stamp the zebra image onto a Silicone Craft Mat using Memento Black ink.
Optional: Use a stamp positioning tool and stamp multiple times for a darker image.
-Carefully place the Silicone Craft Mat ink-side down onto a
piece of Basic White card stock.
-Transfer the image by gently pressing with your fingertips.
-Lift the mat and fussy cut the reflected zebra image with scissors.
Tip: If you don’t have a Silicone Craft Mat, stamp the image onto a window or
transparency sheet and transfer it the same way.
Complete Card:
-Attach the two zebra images back-to-back, then adhere them along the inside edge of the card front panel so the reflection appears through the opening.
-Attach the Basic Black strip, aligning the circle opening with the half-circle cut.
-Adhere a narrow strip of Real Red card stock along the inside score line for a pop of color.
-Mount the completed card front onto a 5½" x 4¼" Basic Black piece to finish.
Supplies Used:
Stamp Set: Silly Safari, Bee My Valentine
Ink: Memento Black, Real Red
Paper: Basic Black, Basic White, Real Red
Accessories: Stampin' Cut & Emboss Machine, Deckled Circle Dies, Stamparatus, Silicone Craft Mat
Quick Links: