Instructions:
Create Bay Window Card Base:
-Cut
Gorgeous Grape cardstock to 4 1/4" x 11".
-Score at 5 1/2", 6 1/2", 7 3/4", 9 1/2", and 10 3/4".
-Fold on the score lines: mountain, valley, mountain, mountain, valley (mountain = fold up, valley = fold down).
-Apply adhesive between the 5 1/2" and
6 1/2" score lines to form the card base.
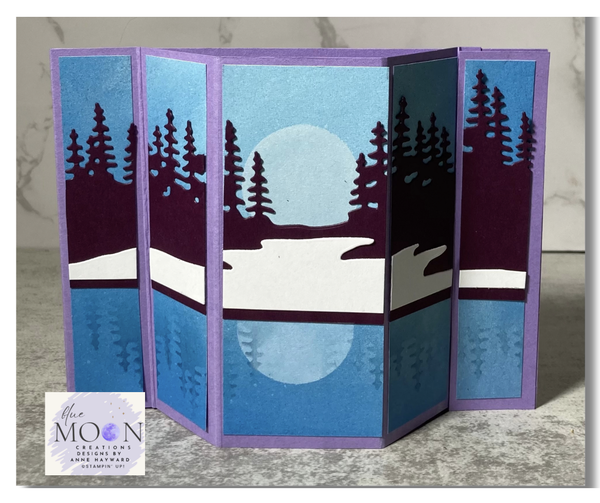
Create Full Moon Reflection Card Front:
-Cut Lights of Aurora DSP to 4" x 6".
-Die cut mountains (Blackberry Bliss) and snow (Basic White) with Light & Wonder
dies.
-Make a moon mask with a punched or die-cut circle from masking paper or a sticky note.
-Place the mask in the center of the card front; add White Craft Ink with a Blending Brush.
-Move the mask below the landscape edge to create the moon’s
reflection; add White Craft Ink again.
-Attach the trees and snow to the card front.
-For tree reflections, flip the tree stencil upside down, position below the landscape, and lightly blend Balmy Blue ink.
Complete the Card:
-Cut the card front into panels:
1st panel: 3/4"
2nd panel: 1"
3rd panel: 1 5/8"
4th panel: 1"
5th panel: 3/4"
-Attach panels 1–4 across the card base.
-Attach panel 5 on the right edge, using adhesive only along its right side so the 1/4" strip can slip behind. Use Mini Dimensionals if
needed to allow extra space.
-For the inside: Stamp a greeting on a 3 1/4" x 3 3/4" piece of Basic White using Blackberry Bliss ink. Attach inside, then add Frosted Iridescent Dots to finish.
Supplies Used:
Stamp Set: Light and Wonder
Ink: Craft White, Blackberry Bliss, Balmy Blue
Paper: Gorgeous Grape, Blackberry Bliss, Basic White, Lights of Aurora 6"x6" Designer Series Paper
Accessories: Stampin' Cut & Emboss Machine, Light and Wonder Dies, 1 1/2" circle punch, Post-It Note, Blending Brushes, Frosted Iridescent Dots